
To install a downloaded Procreate brush, import the actual .brush, .brushset, or .brushlibrary file, then find the item it creates. If the download is a ZIP, extract it first. Once the brush is in place, decide whether to move it into a working set or keep a copy in both locations.
This guide follows Procreate 5.4 for iPad. Its brushes are stored through Files, so moving or deleting a brush can change the live file too. That’s why I’d keep the original download and export any version you edit to a separate archive before removing anything.
Start with the brush file, not its ZIP container
Procreate supports its native .brush, .brushset, and .brushlibrary formats, plus Photoshop .abr files. A ZIP packages files for delivery. It isn’t one of those brush formats.
- If the download ends in
.zip, open Files and find it. Tap the ZIP to create a folder containing its files, then open that folder. - Find the supported brush file inside. If there is another ZIP inside, extract that archive the same way and open its folder. Do not change a ZIP’s extension to make it look like a brush file.
- Keep the original package with its filename and license. Retain the creator’s name and download page too. Check the license separately for drawing, commercial work, and any redistribution.
If Files can’t extract the archive, or the package contains no supported brush file, take it up with the download’s creator before you try to import it. A familiar filename alone doesn’t prove the file is complete or valid.
Import one file and find what it created
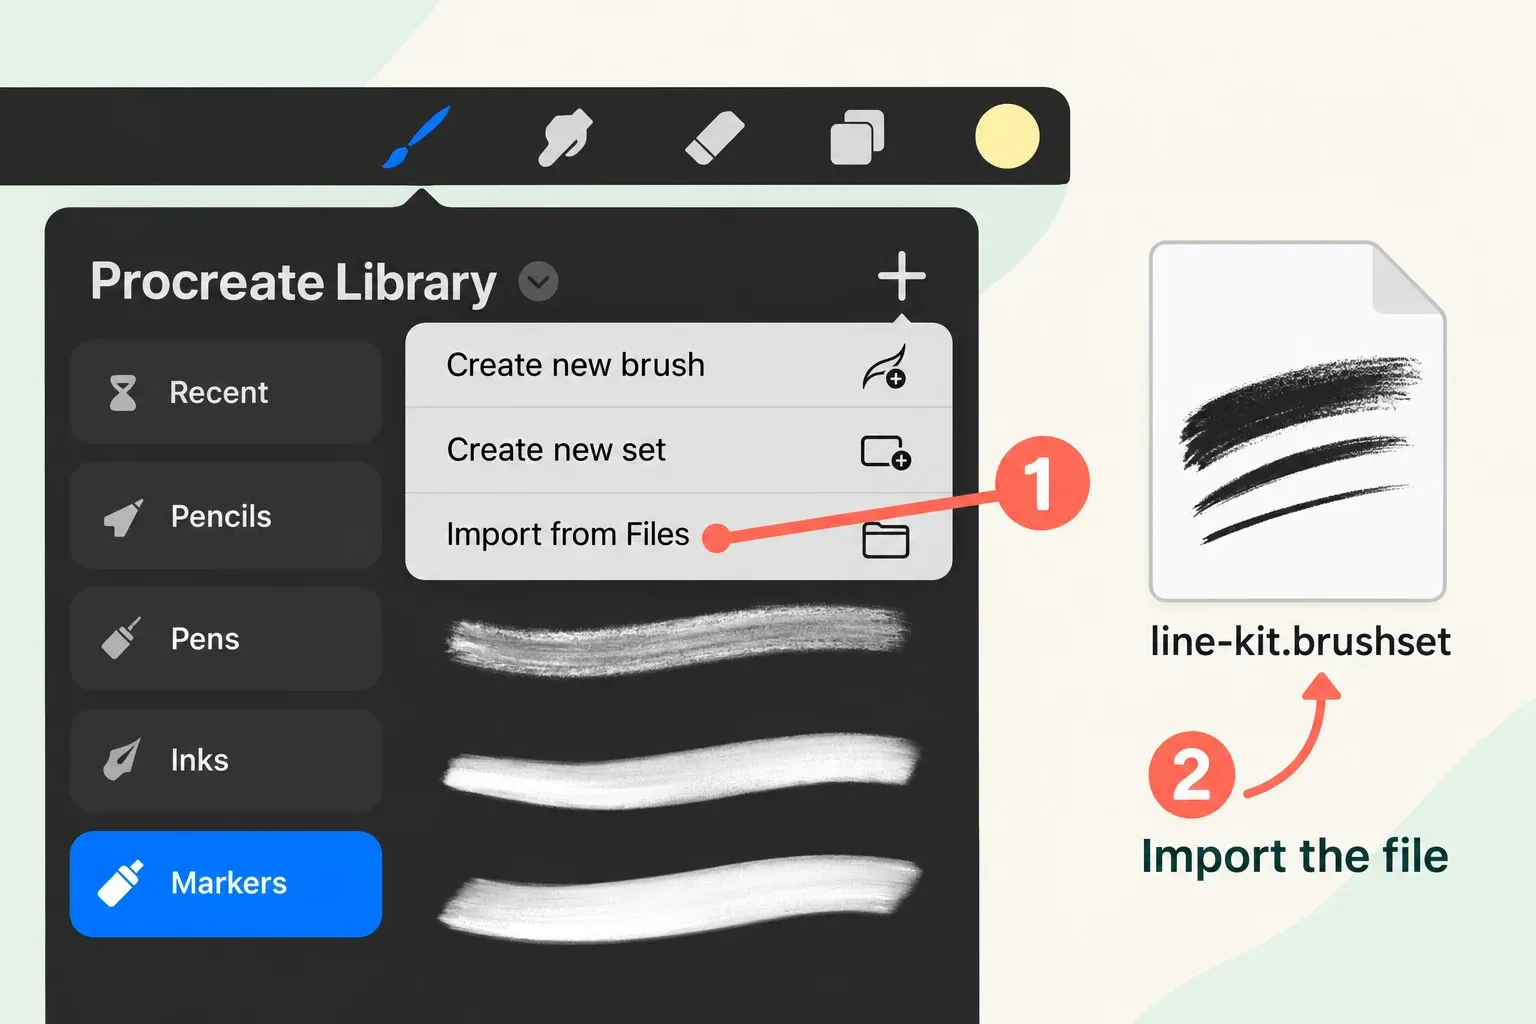
For a native Procreate file, use the Import from Files route in Brushes:
- From a canvas, open Brushes through Paint, Smudge, or Erase.
- Open the top-right menu and choose Import from Files.
- Locate the extracted
.brush,.brushset, or.brushlibraryfile and tap it. Find the result before importing the rest of a download.
For a Photoshop .abr file, the handbook describes a drag-and-drop import from Files or another compatible app: hold the file to pick it up, then drop it into Procreate. Tapping a supported file online or in an email can also show an import prompt. Check the imported brush’s mark before you rely on it for a drawing, because format support isn’t a promise of identical Photoshop rendering.
Use the file type to choose where to look
The native import destinations differ because a brush, a set, and a library are different objects:
| Imported file | What to find | Where to look |
|---|---|---|
.brush | One brush | The set named Imported |
.brushset | A named brush set | The set list in the current library |
.brushlibrary | A library containing sets | The Brush Libraries overview |
To reach the overview, pinch inward in Brushes, or tap the current library title and choose Back to libraries. Open the imported library to see its sets. Look for the name rather than assuming every import appears in the same position.
If an item seems missing, swipe down from the top of the library to open Brush Search. Enter part or all of the brush or set name. Results include the current library, other libraries, and matching sets. Tap a result to activate it; hold a brush result for the option to go to its home set. Check that location before importing another copy.
For an iCloud-stored library, allow time for synchronization before deciding the item is absent. If the correct supported file still won’t import, note the filename, Procreate version, and exact error for the creator or support team. Deleting an existing library isn’t a useful next step.
Create a working set, then move or copy deliberately
Name the set for its drawing purpose, such as Line, Wash, or Lettering. My default is a small working set: it’s easier to navigate than several copies of an entire downloaded collection.
In the intended library, open the top-right Brushes menu and choose Create new set, enter its name, and tap Apply. Return to the imported brush, then choose the result you want:
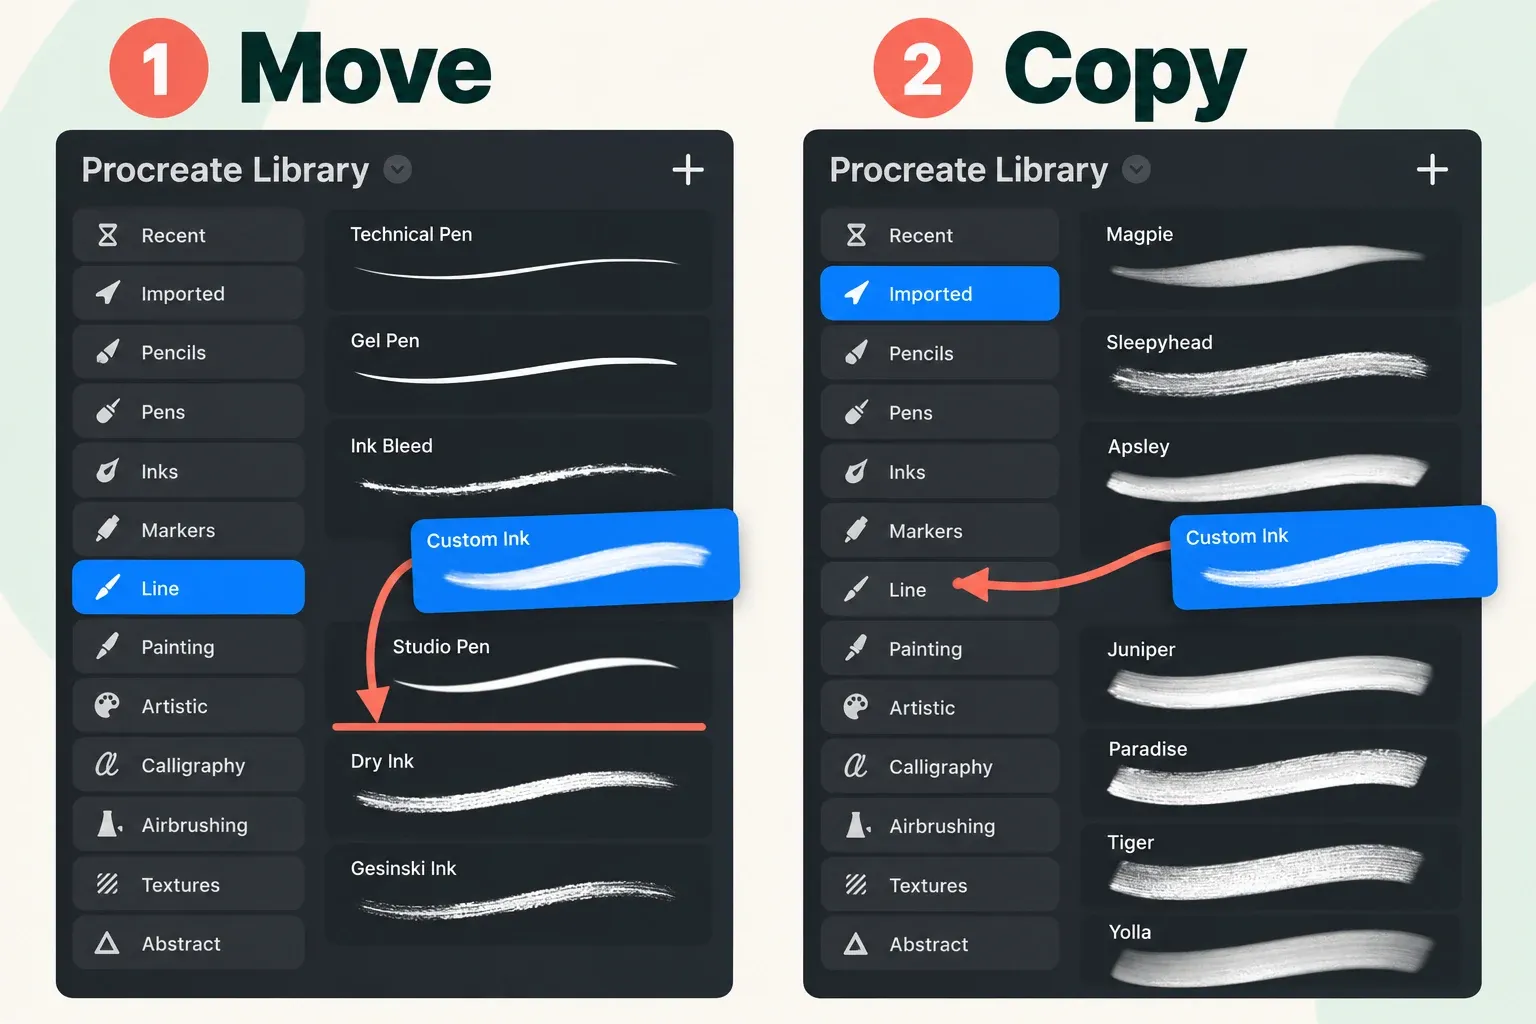
- Move it: hold the brush to pick it up. With another finger, tap the destination set to open it, then release the brush among that set’s brushes. The file leaves its original set.
- Keep it in both sets: hold the brush, hover over the unopened destination set’s title, and release directly on the title. This creates a copy.
The drop target determines whether the brush moves or copies. If the destination flashes and opens, dropping among its brushes moves the file. Check both sets afterward instead of assuming the original remains.
Before changing Brush Studio settings, swipe left on the brush and choose Duplicate. Hold the working brush and choose Rename to distinguish it from the original. To rename a set, tap it twice or hold it, then choose Rename. In 5.4, brush renaming is in Brushes or Files, and older instructions pointing to About this Brush don’t apply to that version. A numbered duplicate is still a live brush, not a separate backup.
When the collection needs its own library
For a large collection, go to the Brush Libraries overview, select the intended On My iPad or iCloud storage area, and use the top-right menu’s Create a new brush library option. The new library is created in the currently selected area. Hold the created library and choose Rename if you want a clearer name.
To move a set between libraries, hold it in its existing library. With your other hand, pinch inward or use the library title → Back to libraries. Open the destination library, then drop the set into its set list. In 5.4 this moves its files; duplicate the set first only if you want it in both live libraries.
Export an archive before deleting or replacing anything
The live 5.4 brush folders are On My iPad → Procreate → Brushes or iCloud Drive → Procreate Brushes. Inside them, library folders contain set folders, which contain individual brush files. Changes in Files and Procreate are reflected in each other. An extra item inside this hierarchy remains part of the live system.
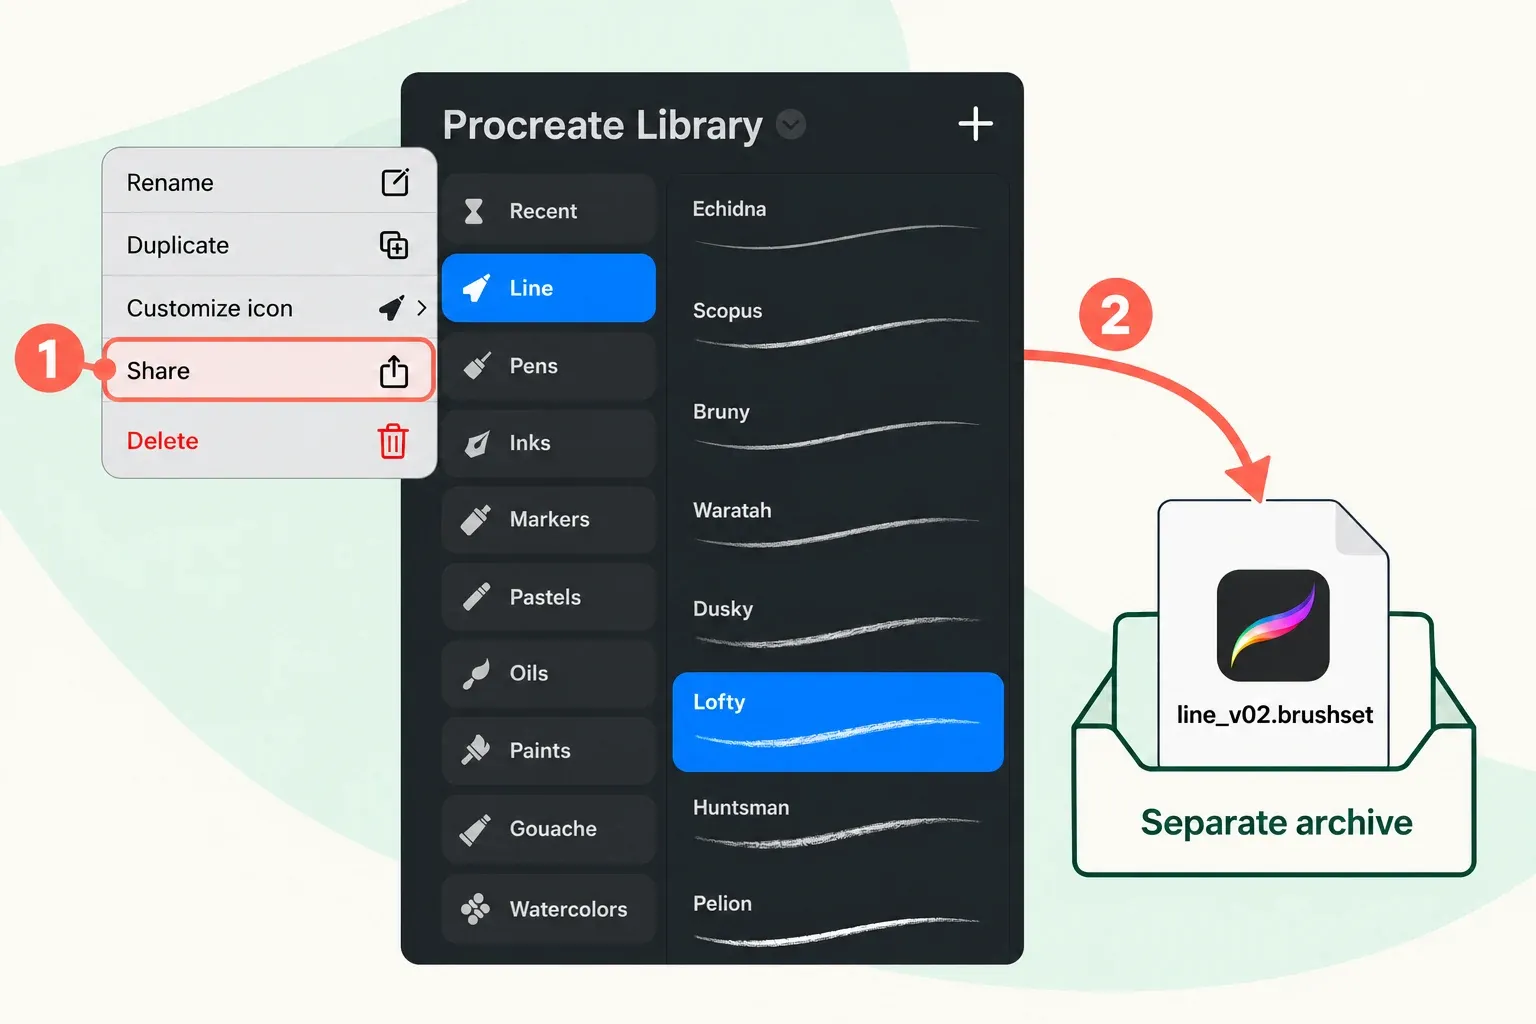
Keep original downloads, but export the current version of any brush you’ve edited. The original package doesn’t preserve those later changes. Use the Share controls for the object you want to archive:
- One brush: swipe left on its thumbnail and choose Share to export a
.brushfile. - A custom set: tap the set twice and choose Share to export a
.brushsetfile. - A whole library: in the overview, hold the library and choose Share.
Choose an iPad-compatible external drive or a dedicated archive folder outside the live brush hierarchy. Confirm that the exported files exist there and use names that distinguish the saved versions. A working duplicate, iCloud synchronization, or an artwork backup alone isn’t evidence of an independent brush archive.
Deleting a brush, set, or library removes it from both Procreate and Files. Before removing an apparent duplicate, compare its source, location, and edited settings, then protect the version you’re keeping. Identical names don’t mean identical brushes. After an accidental deletion, check Files → Locations → Recently Deleted, as the handbook recommends, though recovery isn’t guaranteed.
If you’re changing iPads, import a representative archived brush, set, or library on the receiving device and compare the pressure, tilt, or texture behavior your work needs before retiring the old setup. Connect and sync iCloud-stored brushes before going offline. Brush storage doesn’t imply automatic synchronization of Gallery artwork.
Once the brush is present in the right set, use the brush-settings guide if its mark needs adjustment. Importing an asset and tuning its behavior are separate decisions.
This is an independent guide. It is not affiliated with or endorsed by Procreate.