
Plan the pixel dimensions
Enter the full file size required by your printer, including bleed when required, and its target resolution. If no bleed is needed, use the finished print size.
Existing-art PPI assumes cropping to fill this size. A fit with borders uses the placed image size. Check your iPad's canvas limits before creating the file.
Enter existing canvas pixels to compare its aspect ratio with the requested print size.
Use this planner to turn a printer’s requested size and PPI into canvas pixels, or to check an existing artwork at a proposed print size. Start with the receiving specification: the finished trim size, any required bleed, and the requested image resolution. If a product template supplies exact delivery pixels, use those values.
Enter the delivery size
The calculator’s Width and Height fields accept inches. Enter the full delivery size, including bleed only when the printer asks for it. Convert centimeters by dividing by 2.54, or millimeters by dividing by 25.4; keep that precision until the final pixel calculation.
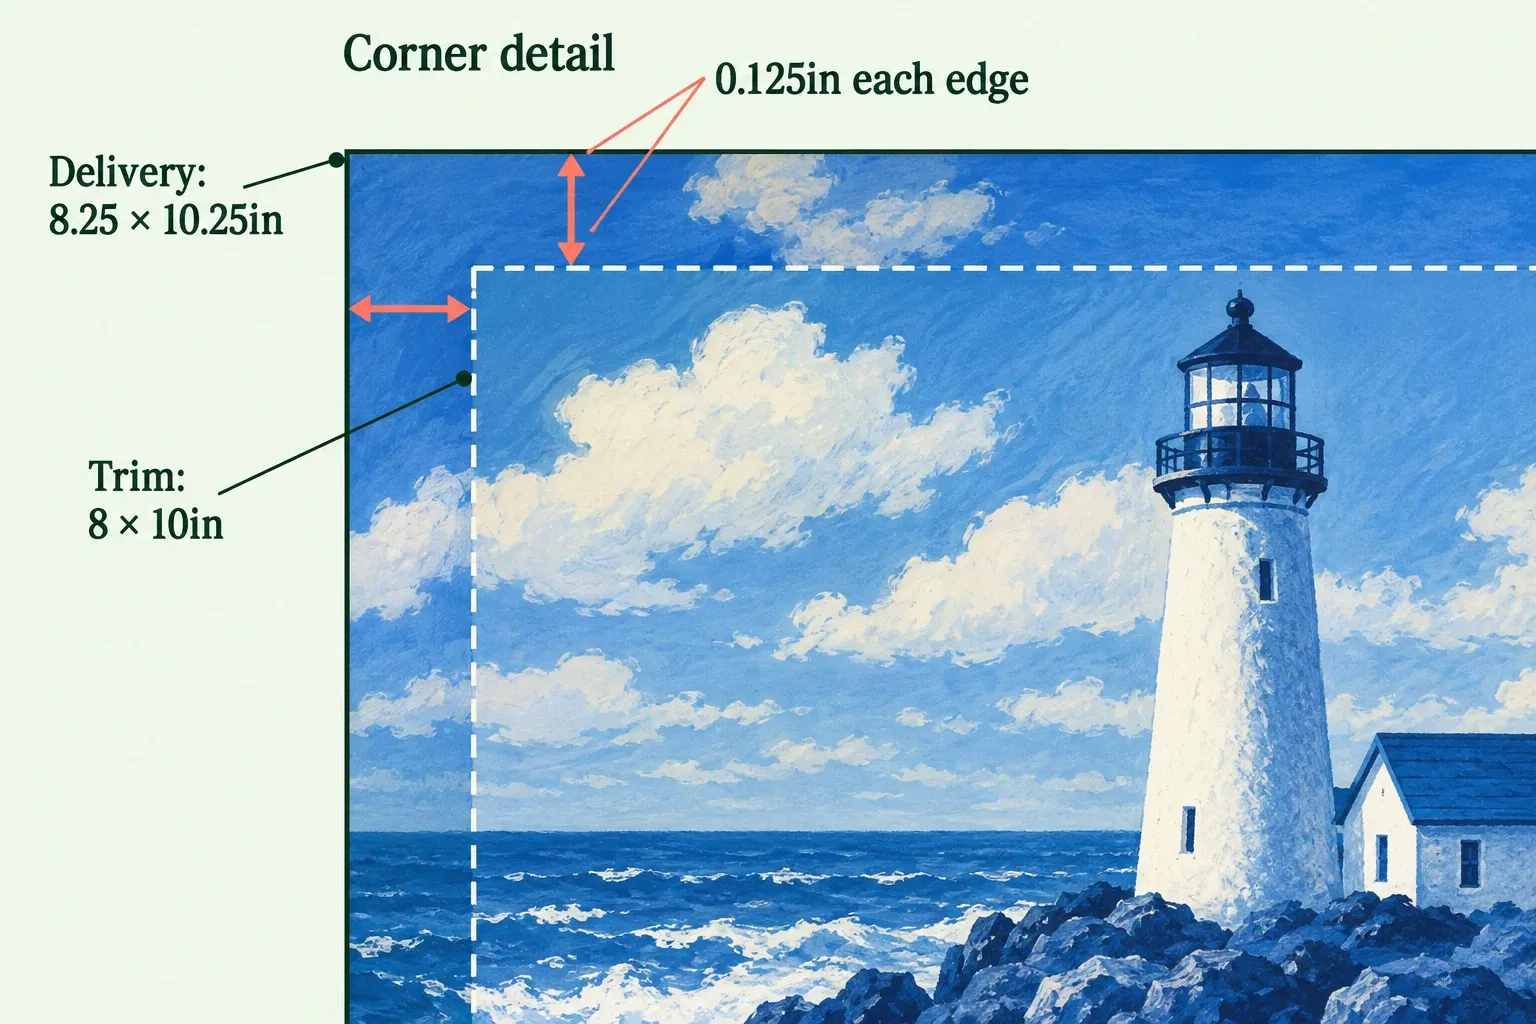
For example, an 8 × 10 inch trim size with 0.125 inch bleed on every edge needs an 8.25 × 10.25 inch delivery canvas. The extra 0.25 inch belongs on both total dimensions. An 8 × 10 trim has a 4:5 ratio. The outer rectangle with this bleed has a slightly different one, so compare existing pixels with the rectangle you plan to deliver.
Choose the requested PPI
Enter the recipient’s image-resolution requirement in Target resolution. This field uses pixels per inch (PPI), even when the receiving guide calls its image requirement “DPI”. It isn’t the printer hardware’s dots-per-inch setting. For example, Printful sets requirements by product and printing technique, so 300 PPI isn’t a universal target.
The results update as you change the fields. There’s no Calculate button. Width and Height accept sizes from 0.1 to 200 inches. Target resolution accepts whole numbers from 72 to 1200 PPI. Required pixels at target PPI multiplies each inch dimension by the target PPI and rounds it to the nearest whole pixel. Round the final pixels, not the intermediate inch conversion.
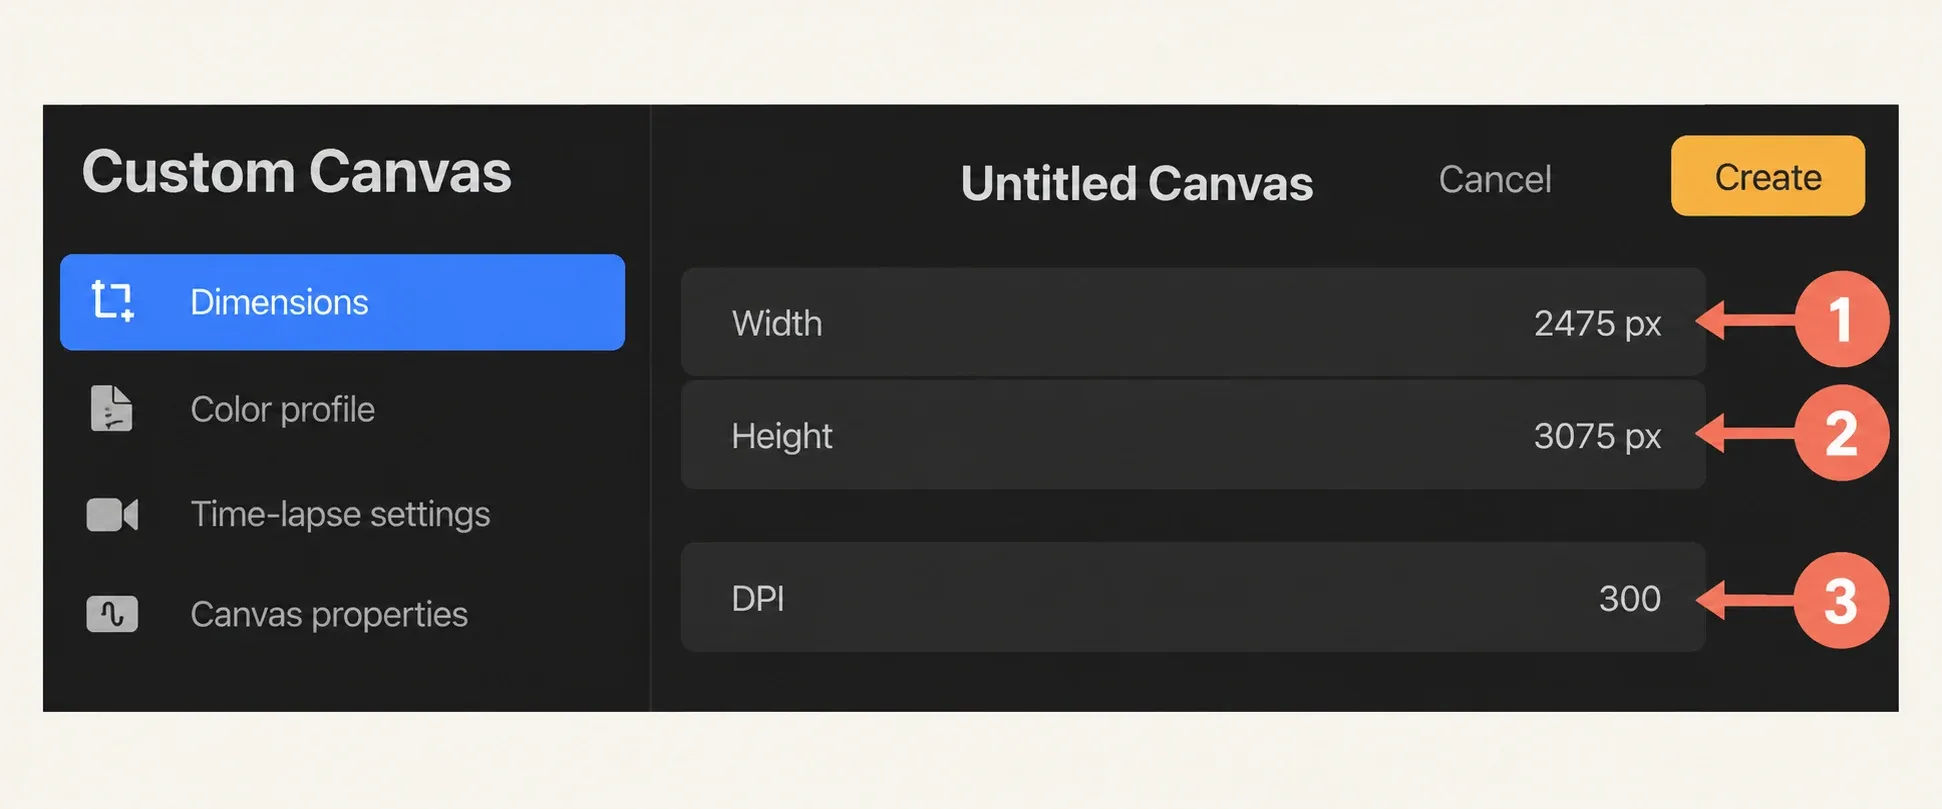
For the bleed example above, enter Width 8.25, Height 10.25, and Target resolution 300. The mathematical target is 2475 × 3075 pixels. Without that requested bleed, 8 × 10 inches at 300 PPI would instead be 2400 × 3000 pixels. Neither result promises a particular print appearance.
Check an existing canvas
Find the artwork’s actual pixel width and height in Actions → Canvas → Canvas information → Dimensions. Enter both values in Existing width and Existing height. These optional fields accept whole pixel counts from 1 to 100,000, not inches; leave both empty when planning a new canvas.
Existing art, cropped to fill divides each existing pixel dimension by the selected inch dimension. It displays the lower of the horizontal and vertical PPI values, rounded to a whole number. When the aspect ratios differ, that value assumes proportional cropping to fill the requested rectangle. A fit with borders uses the placed image dimensions and can give a different PPI. For 2475 × 3075 pixels at 8.25 × 10.25 inches, both axes give 300 PPI. For an existing 2400 × 3000 file at that same delivery size, the axes give about 290.9 and 292.7 PPI, so the displayed limiting value is 291 PPI.
The ratio message compares existing width ÷ height with requested width ÷ height. A warning appears above a 0.5% relative ratio difference. At or below that threshold, the message asks you to confirm the printer’s crop or fit tolerance. That threshold belongs to the calculator; it isn’t an allowance your printer has approved. The limiting PPI comparison hasn’t cropped or fitted the artwork for you.
Create the result in Procreate
- From Gallery, tap +, then the rectangle-with-plus custom-canvas icon in the New Canvas menu.
- In Dimensions, choose Pixels as the unit and enter the recommended Width and Height. For the conditional example, use 2475 and 3075. Set DPI to the same target PPI (300 in this example) to record the intended scale.
- Open Color profile and choose the recipient-required profile before drawing. The example below uses RGB → sRGB IEC61966-2.1 only if that is what the recipient requests. Procreate lets you change profiles within an existing RGB or CMYK space, but cannot switch that artwork between RGB and CMYK.
- Check Maximum Layers for these dimensions on your iPad. Larger canvases allow fewer layers. If the result cannot support the project, resolve the canvas specification with the printer before drawing. Tap Create once the settings are settled.
Check the new canvas’s Dimensions against your input note. Changing DPI alone changes the recorded physical size without adding pixels, so it can’t repair an undersized existing file.
Print planning formulas
| Question | Formula | Example |
|---|---|---|
| Required pixel width | width in inches × target PPI | 12 × 300 = 3600 px |
| Required pixel height | height in inches × target PPI | 18 × 300 = 5400 px |
| Effective horizontal PPI | existing pixel width ÷ print width | 3600 ÷ 12 = 300 PPI |
| Aspect ratio | width ÷ height | 12 ÷ 18 ≈ 0.667, or 2:3 |
The calculator does not upscale the artwork
The recommended dimensions are a target for creating a canvas. Entering a larger print size or target PPI doesn’t add detail to an existing file. The existing-canvas fields show how many pixels are available per printed inch at the requested size.
Resolve bleed and aspect-ratio differences explicitly
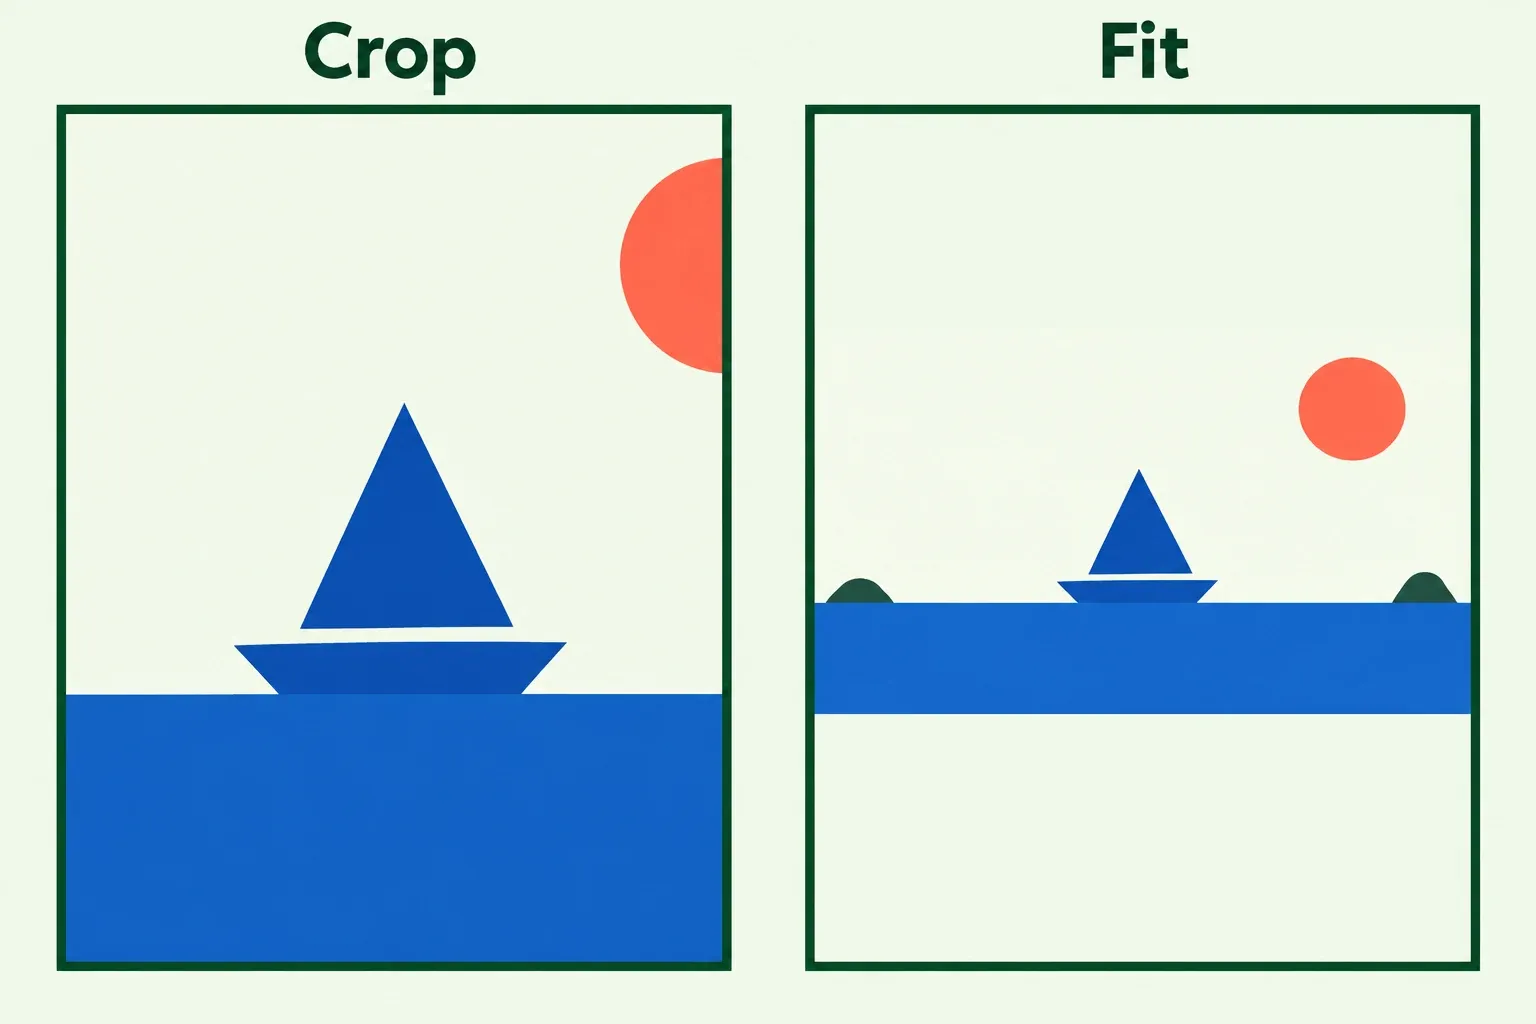
When the existing canvas ratio differs from the print, choose crop, fit, or a different print size. Crop removes content, while fit leaves space or borders around the artwork. Filling the requested print rectangle without borders while keeping the artwork’s proportions requires cropping when the aspect ratios differ. Since crop throws content away, I’d secure the original first. Keep the layered source before changing the composition, then use the calculator again with the actual delivery dimensions and pixels after that decision.
Check the destination conditions outside the calculation
The calculator doesn’t supply product templates, safe areas, color profiles, compression rules, or physical proofing. The calculated target describes geometry and resolution. It doesn’t predict how ink, paper, sharpening, viewing distance, or finishing will affect the print. Keep the layered source and printer template with the project, and record trim size, bleed on each edge, delivery size, target PPI, and final integer pixels in the delivery note.
After export, inspect the actual file’s dimensions, format, transparency, and embedded profile. Working-canvas settings don’t prove the final exported ICC tag. If you already use Photoshop desktop and it supports the file, record your current Color Settings, then use Edit → Color Settings with Preserve Embedded Profiles for the file’s color model. Enable Ask When Opening under both Profile Mismatches and Missing Profiles. Open the export and keep its embedded profile if warned; do not convert it during inspection.
Choose Document Profile and Document Dimensions in the menu beside the bottom document status display, and record the values and any missing-profile warning. Do not assign a profile or resave merely to pass this check; restore your previous Color Settings afterward. If no compatible inspector is available, ask the recipient to confirm dimensions and the embedded profile, and leave those checks unconfirmed until resolved. For artwork that needs a transparent background, also check the saved PNG’s transparency.
If a receiving service reports different preflight values, reconcile them before resizing again. A consequential print still needs the printer’s proofing process. Use the canvas-size-for-print guide when planning the composition around the receiving template.
This is an independent guide. It is not affiliated with or endorsed by Procreate.