
To make a brush in Procreate, open Brushes, tap the + button at the top right of the brush list and choose Create new brush, or swipe left on a brush that's close to what you want and tap Duplicate. Brush Studio opens. Give the brush its mark in Shape and its texture in Grain, try it on the Drawing Pad, then tap Done. Rename it afterwards from the Brushes list, because since Procreate 5.4 the name can't be changed inside Brush Studio.
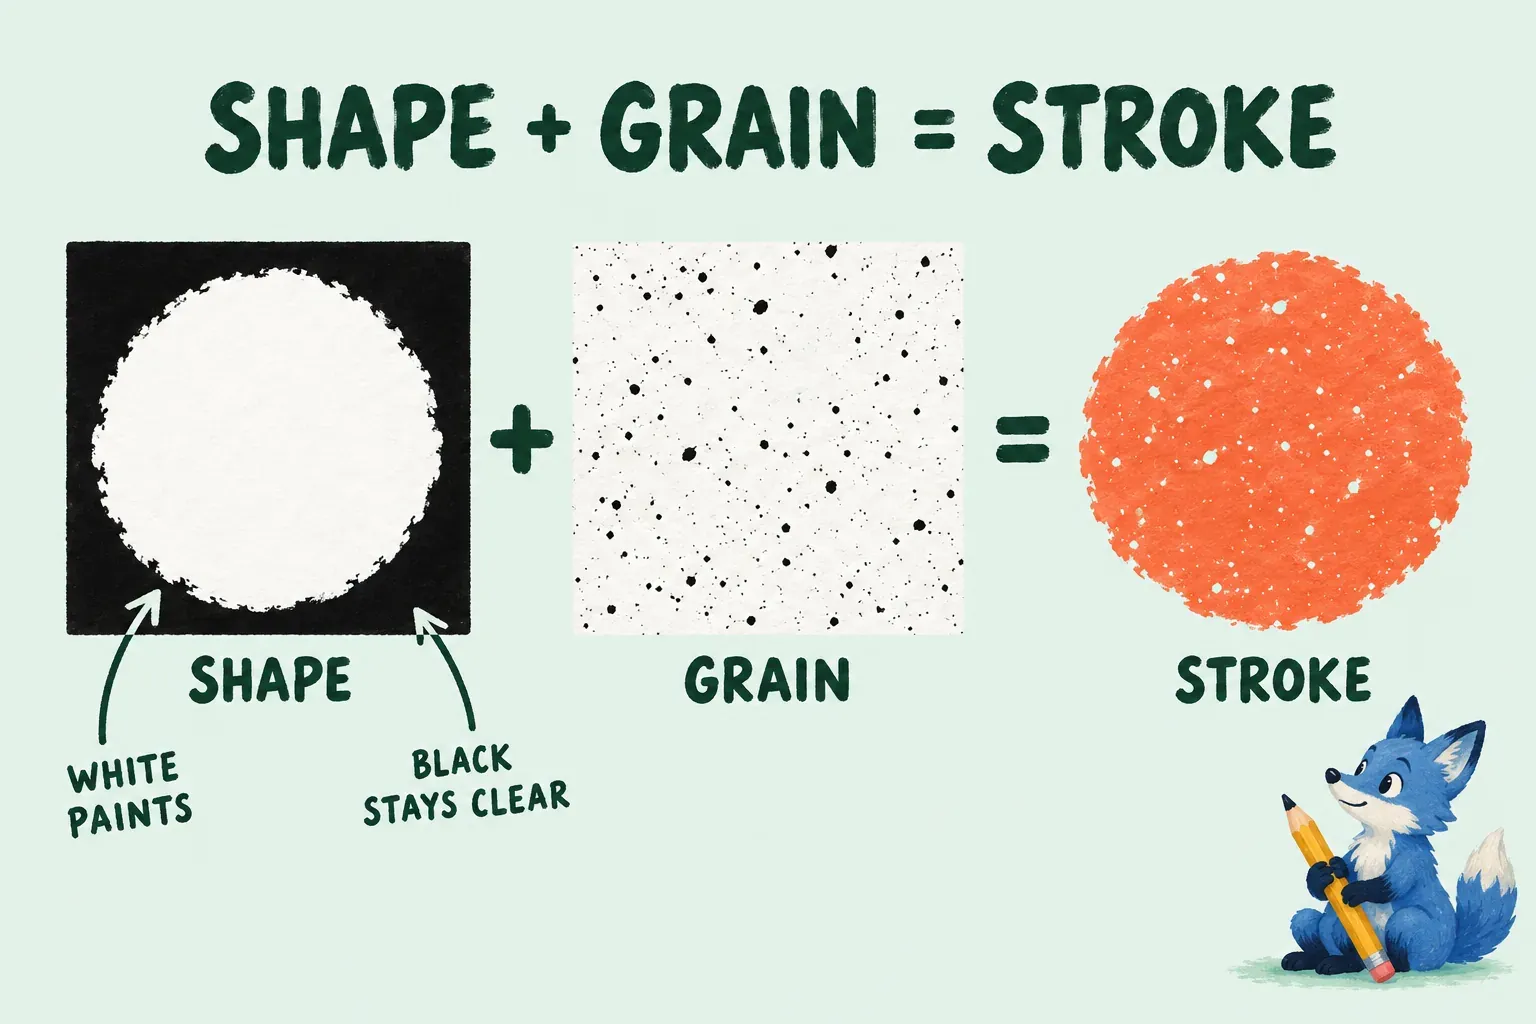
One rule decides whether a homemade brush works: in a shape or grain image, white paints and black stays clear. Most brushes that paint a solid square, or nothing at all, break that rule. The steps below follow Procreate 5.4 for iPad and the Brush Studio section of the Handbook.
Should you duplicate a brush or start from +?
My default is to duplicate when a brush you already like has the right feel and only the mark is wrong. The copy keeps its pressure, taper and smoothing, so you change one thing and the original stays untouched. Start from + when you're bringing in your own shape or texture and want nothing inherited from another brush.
- Duplicate: open Brushes from the Paint, Smudge or Erase tool, swipe left on the brush and tap Duplicate. Procreate adds a number to the copy's name. Tap the copy once to select it, then tap it again to open Brush Studio.
- Start new: tap the + button at the top right of Brushes. The menu offers Create new brush, Create new set and Import from Files. Create new brush puts the brush in the set you have open and takes you straight into Brush Studio.
I'd open your own set before tapping Create new brush, because the new brush lands in whichever set is open. With Create new set, type a name and tap Apply; the set appears above your other sets. Keeping your brushes together also means you can export them later as one file.
If you only want a particular look, check what already exists first. For ink lines, the built-in line art brushes are a strong base to duplicate. For a wash, a free watercolor pack may already do what you were about to build.
What do Shape and Grain do?
Every Procreate brush is a shape that holds a grain. The shape is the stamp: tap the canvas once with your finger or Apple Pencil and you see a single stamp instead of a stroke. Drag it and the stamps join into a line. A smooth circle gives a smooth stroke, while an irregular, patchy shape gives a rougher one.
The grain is the texture inside that shape. The Brush Studio settings page compares it to a paint roller that rolls the texture onto the canvas as you draw.
Both images are read in tones, not colors. A Folio moderator puts it plainly in a help thread on custom brush sources: white in a Shape or Grain Source paints fully opaque, black is completely transparent, and gray falls in between. Make your source images black, white and gray so you can predict the result.
Build the brush in Brush Studio
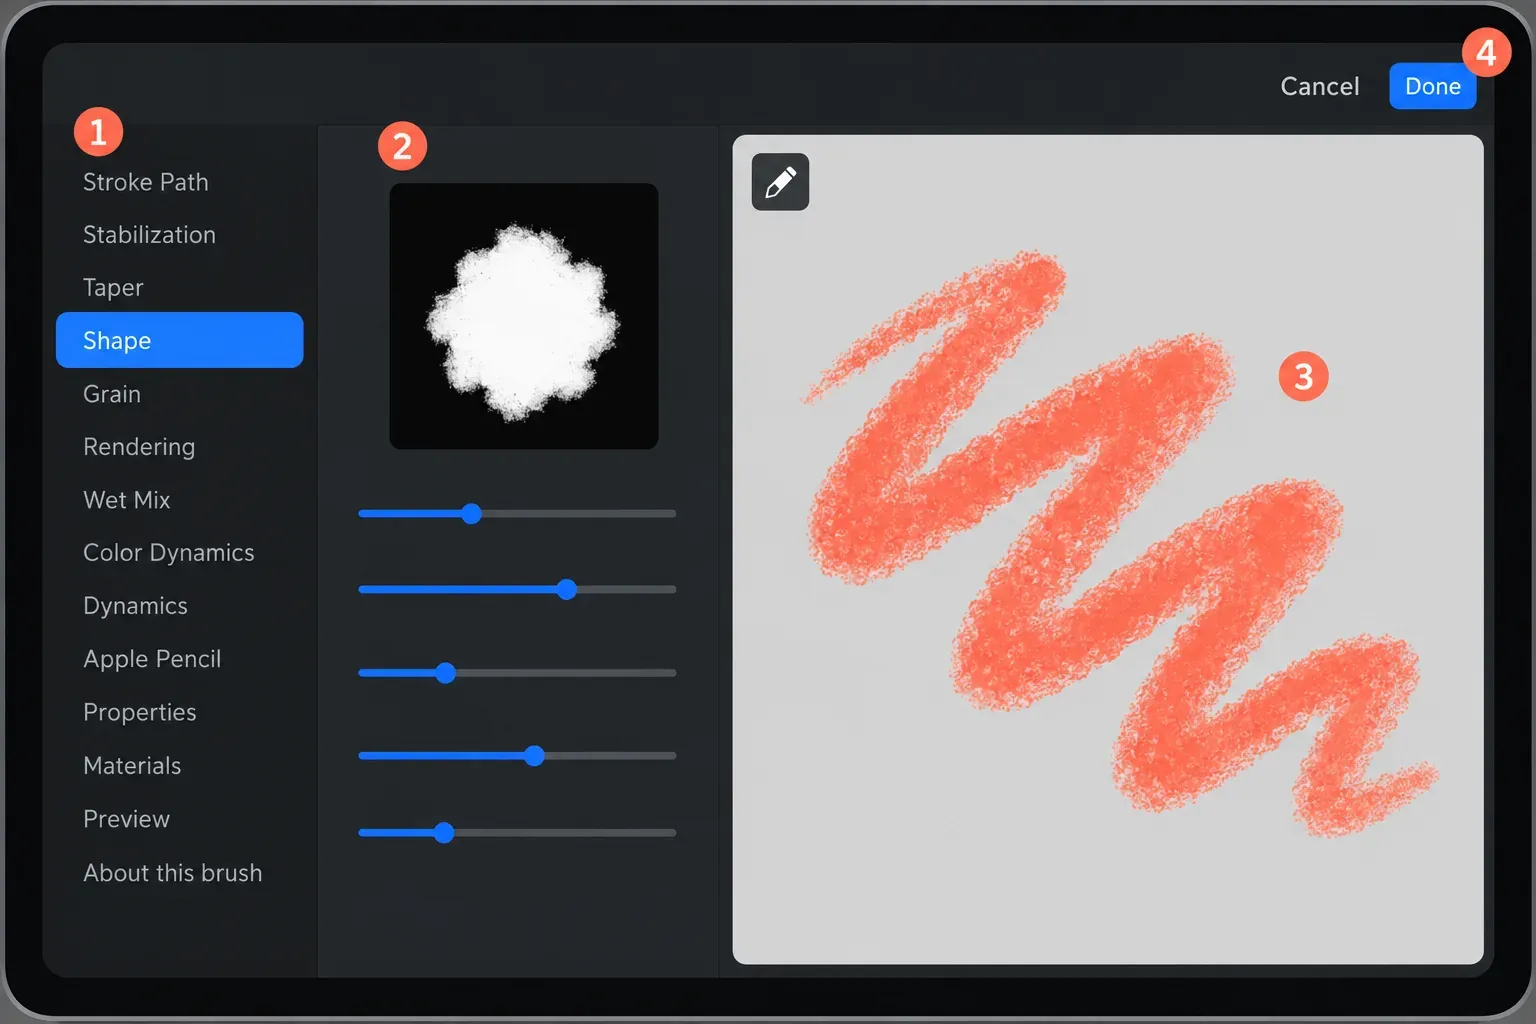
Brush Studio has three parts. Attributes run down the left, the settings for the selected attribute sit in the middle, and the Drawing Pad on the right shows the result live. There are 14 attributes. You need two of them to make a brush, plus a quick look at a third.
- Set the shape. Tap Shape, then Edit at the top right of the shape preview to open the Shape Editor. Tap Import and bring in a photo, a file or a copied image, or choose Source Library for a ready-made shape. The Source Library has a search box; searching "gouache" brings up shapes made from gouache marks. Tap Done to close the editor.
- Set the grain. Tap Grain, then Edit in Grain Source to open the Grain Editor. Its Import menu has four routes: Import a Photo from the Photos app, Import a File from the Files app, Source Library with more than 100 textures, and Paste for an image on your clipboard. Tap Done.
- Choose how the grain behaves. Moving drags the grain along with the stroke for a streaky, blurred look. Texturized keeps the texture still behind the stroke, closer to a stencil. I'd pick Texturized for a paper or canvas texture that should look the same everywhere, and Moving when the brush should read as paint being pushed around.
- Check the spacing. Open Stroke Path and push Spacing up. The Handbook suggests this so you can see each stamp separately, which shows you what your shape does. Bring it back down until the stamps merge into a continuous line.
That's a working brush. Pressure, taper, smoothing and wet mixing all live in other attributes, and the brush settings guide goes through them one visible problem at a time. My default is to save the brush once the mark looks right and tune those controls afterwards, so one bad slider doesn't cost you the shape and grain you set up.
Turn a photo or drawing into a brush
Decide first where the image belongs. A single object, a leaf, a star or a signature mark goes in Shape, because that's the stamp you see with each tap. A surface such as paper, canvas, bark or sponge goes in Grain, where it repeats inside the stroke.
Then prepare the image so the brush engine reads it the way you expect:
- Crop it square. RetroSupply's brush guide notes that Procreate stretches other ratios to fit a square, so a wide photo comes out squeezed. The same guide lists JPEG, PNG, TIFF and GIF as usable formats.
- Remove the color. On a square canvas, use Actions → Add → Insert a photo, then Adjustments → Hue, Saturation, Brightness and drag Saturation all the way down.
- Raise the contrast. In Adjustments → Curves, dragging a node left or right changes contrast. Push the texture toward clear whites and blacks so the brush doesn't come out muddy.
- Copy and paste it into the brush. In the Layers panel, tap the layer and choose Copy. In Brush Studio, open the Shape or Grain editor, tap Import → Paste, and tap Done. Paperlike walks through this same sequence in its textured inking brush example.
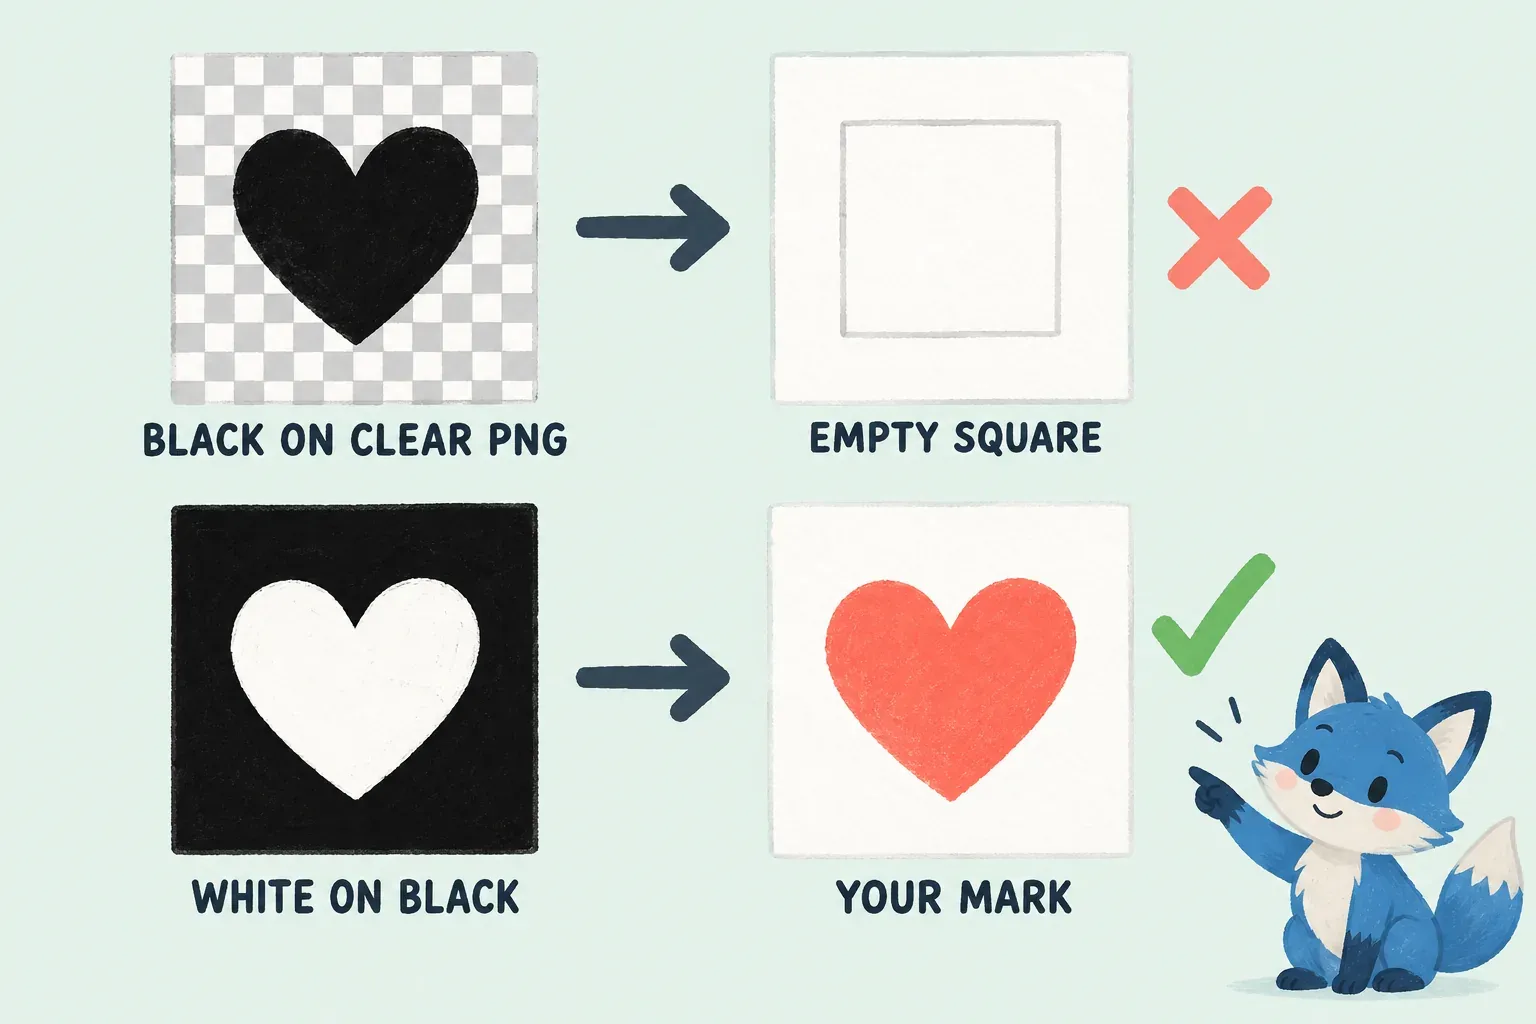
A dark drawing on a white page arrives as the opposite of what you want, because the black lines read as clear and the white paper paints. In the Grain Editor, a two-finger tap on the image inverts its tones, and a second two-finger tap reverses that. The Folio moderator gives the same two-finger tap for a Shape image.
Transparent PNGs trip people up most. In a Folio thread about a heart-shaped brush, a black design on a transparent background imported as a completely blank square, because black reads as clear and so does the transparent background. The moderator's fix is to draw the design in white, or save it on a solid background as a JPG and invert it.
For a grain photo, turn on Auto Repeat in the Grain Editor so the texture repeats without visible tile edges. Its controls are Grain Scale, Rotate, Border Overlap, Mask Hardness, Mirror Overlap and Pyramid Blending, and the preview updates live. I'd start with Pyramid Blending for wood, stone and other irregular natural textures, because the Handbook recommends it for those; the simpler edge modes suit regular, high-contrast patterns. Use your own photos or textures you have permission to use.
Test the brush and save it with Done
Scribble on the Drawing Pad after each change. The square-and-pencil icon at its top left opens its settings: Clear Drawing Pad, Reset all Brush Settings and Preview Size. Reset all Brush Settings applies only to the current brush, but it still undoes your work on that brush, so use Clear Drawing Pad when all you want is a clean pad.
Tap Done at the top right to save. Cancel discards every change since you opened Brush Studio, which is useful after a bad experiment and painful by accident.
Then draw with the brush on a spare canvas at the size you'll use it. The Drawing Pad shows the mark quickly, but your own canvas has the real layer, background and scale, and that's where spacing or grain problems become obvious.
Name it, sign it and set a reset point
To rename the brush, close Brush Studio, tap and hold the brush in the Brushes list and choose Rename. You can also rename it in the Files app. Since 5.4 there's no title field in Brush Studio, so guides that tell you to name the brush when you tap Done or under About this Brush describe older versions. Brushes and sets are now files and folders, so names can't contain < > : " / \ | ? % * or start with a period.
About this Brush in Brush Studio holds the rest:
- Your credit. Add your name and a handwritten signature, and an author picture if you want one. The signature is embedded in the .brush file, so anyone who opens your brush in Procreate sees your credit under About this Brush.
- Create New Reset Point. This saves the current state as a checkpoint. Each brush has only one active reset point, so a new one replaces the old.
- Reset brush. This returns the brush to its reset point. With no reset point, it goes back to the state it had when you created or imported it. To find it later, tap the brush twice to open Brush Studio, then tap About this Brush → Reset Brush.
I'd create a reset point the moment the brush looks right, before tuning pressure or smoothing. It's a one-tap way back to the version you liked. For two or three variations, duplicate the brush instead, so each copy keeps its own reset point.
Export the brush and keep a copy
To share one brush, swipe left on its thumbnail and tap Share; Procreate packages it as a .brush file. To share a whole set, tap the set twice and choose Share for a .brushset file. Send it to Files, AirDrop or wherever you keep archives.
Your live brushes are stored in Files at On My iPad → Procreate → Brushes or iCloud Drive → Procreate Brushes, and changes you make there show up in Procreate. Deleting a brush library in Procreate removes it from Files as well, and that deletion is permanent. If a brush, set or library goes by accident, check Recently Deleted in the Files app.
My default is to export the finished set to a folder outside that live brush folder. A copy left inside it is still part of the live library, while an exported .brushset survives a deleted set. The guide to backing up brushes outside the live library covers the archive step by step.
Why does my new brush paint a square or nothing?
| What you see | Likely cause | What to do |
|---|---|---|
| A solid square with your design cut out of it | The source is a dark design on a white or light background, so the background paints and the design stays clear | Two-finger tap the image in the editor to invert it, or redraw the design in white on black |
| Nothing, or a faint ghost of a stroke | The source is a black design on a transparent background, or mostly black or dark gray, so almost everything reads as clear | Redraw the design in white, or save it on a solid background, invert it and raise its contrast with Curves |
| A repeating grid or hard edges inside the texture | The grain tile doesn't join up with itself | Turn on Auto Repeat in the Grain Editor and try Mirror Overlap or Pyramid Blending |
| A dotted line instead of a continuous one | Spacing is high, so separate stamps show | Lower Spacing in Stroke Path until the stamps merge |
| The brush lost everything you set up | Cancel was tapped instead of Done | Rebuild the change and tap Done, then create a reset point |
| No way to rename it in Brush Studio | Renaming moved out of Brush Studio in 5.4 | Close Brush Studio, hold the brush in Brushes and tap Rename |
If pressure changes nothing on your new brush or on any of the built-in ones, the brush you made isn't the problem. Work through the checks for Apple Pencil pressure not working before you change its Apple Pencil settings.
Combine two brushes into a Dual Brush
A Dual Brush merges two brushes, each with its own shape and grain, into one new brush. It's a quick way to add a texture brush on top of a clean line brush without rebuilding either.
- Put both brushes in the same set. Only single brushes combine, so an existing Dual Brush can't be used. Since 5.4, default brushes can be combined.
- Tap the first brush. It turns bright blue as the Primary.
- Swipe on the second brush to select it. It turns dark blue as the Secondary.
- Tap Combine at the top right of the brush library.
The new brush takes the Primary brush's name. Rename it with tap and hold → Rename, and open it in Brush Studio to edit either half. The Dual Brush page explains Combine Mode and how to uncombine.
This is an independent guide. It is not affiliated with or endorsed by Procreate.