Procreate has no pixel art mode. Start with a tiny canvas sized in pixels, a hard one-pixel brush with No Filtering, and Nearest Neighbor for moves and scaling. Keep the asset at the pixel dimensions your project requires; make a separate whole-number upscale when you need a larger display image.
Procreate's team is open about the fit. In the long-running Folio request for pixel art support, a staff member wrote in 2021 that Procreate "is primarily designed for illustration and painting on a larger scale" and marked the request as not planned. In 2022 the team called pixel art "workable in Procreate (to an extent)," and artists in the same thread were still asking for blur-free sprite export and uninterpolated transforms in September 2026. Below: the canvas, the grid, the brush, fills, moving pixels, the export that keeps edges sharp, animated sprites, and a table of fixes.
Set up a pixel canvas
In the Gallery, tap +, then the rectangle with a + at the top right to open Custom Canvas. Switch the unit to Pixels and type the width and height. The Handbook's Gallery Create page says a canvas can be as small as 1 x 1 pixels, and that smaller canvases allow more layers, which works in your favor here. The exact number for each size is in how many layers a canvas allows.
| Canvas size | Good for |
|---|---|
| 32 x 32 px | One character or item. Jellytempo calls it a common sprite size |
| 64 x 64 px | A character with room for an outline and two or three shading steps |
| 128 x 128 px | A detailed character, a portrait or a small scene |
| 160 x 144 px | A full scene at the original Game Boy screen resolution |
Another user in that Folio pixel art support request keeps canvas presets at 32, 64 and 128 px. That set is worth copying: each size doubles the last, and each one scales to a clean export size later. Leave DPI alone. The Actions Canvas page says changing DPI alters the physical print size and "will not alter the pixel size," so it does nothing for how the sprite looks on screen. For prints, canvas size and DPI for print covers the paper side.
For color, Jellytempo's pixel art guide suggests sRGB IEC61966-2.1 for art you'll post on the web or in apps, and Display P3 only when it stays on Apple devices. A sprite usually ends up on screens you don't control, so sRGB is the safer pick, and choosing a color profile explains the difference. The Custom Canvas screen also holds Time-lapse Settings for each canvas, from 1080p to 4K, and the time-lapse guide covers which resolution to pick.
Add a 1 px grid
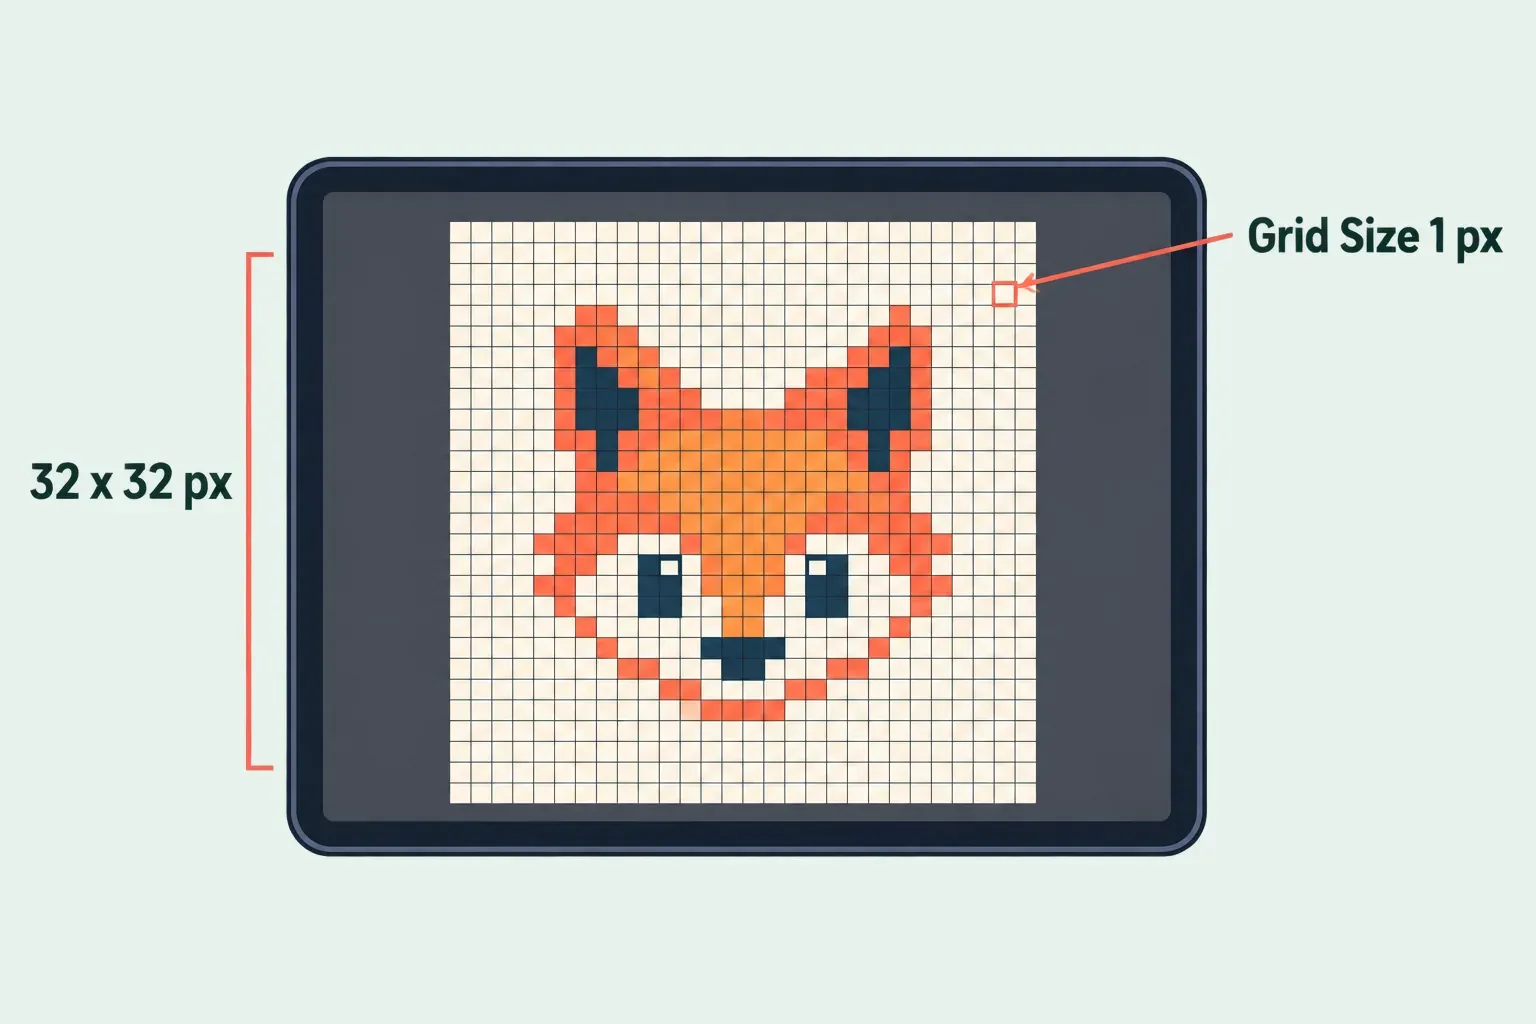
A grid shows where each pixel sits, and it's the aid Procreate's staff pointed to in that request thread: "setting a 2D Grid with a 1px Grid Size can help." Go to Actions → Canvas → Edit Drawing Guide, tap 2D Grid and set Grid Size to 1 px. The 2D Grid page lists Opacity and Thickness on the same screen. Lower Opacity until the grid reads as a faint mesh, so it doesn't change how neighboring colors look, then tap Done.
Drawing Assist is the other switch on that screen. It bends your strokes to "match the direction of the guide lines," which on a 2D Grid means horizontal and vertical. That helps with a long floor or wall line and fights you on diagonals and curves. My default is Drawing Assist off, switched on only for a run of straight edges, because most of a sprite's outline is curves and stepped diagonals.
Jellytempo's guide names the cost of drawing freehand: one-pixel brushes "are prone to errors when not drawn within the lines of the guide," such as doubles and jaggies, the stray extra pixels and uneven steps that make a line look messy. Short strokes keep those down, and for a tricky stretch you can place pixels one tap at a time.
Get a hard one-pixel brush
A pixel needs a brush that puts down solid squares with no softened edge. You have two routes:
- Use a ready set. Bardot Brush's free pixel art set costs $0.00 and includes four brushes, three ready-to-go canvases and a 13-page guide, and it needs Procreate 5.2 or later. Its One-Pixel Stamp fills a single pixel, and raising the size slider fills a bigger square. Ittai Manero shared a free mini pixel brush set on Folio and says anything you make with his brushes can be used commercially. His full set has 46 pixel brushes, including a 1 px brush and 11 dithering brushes.
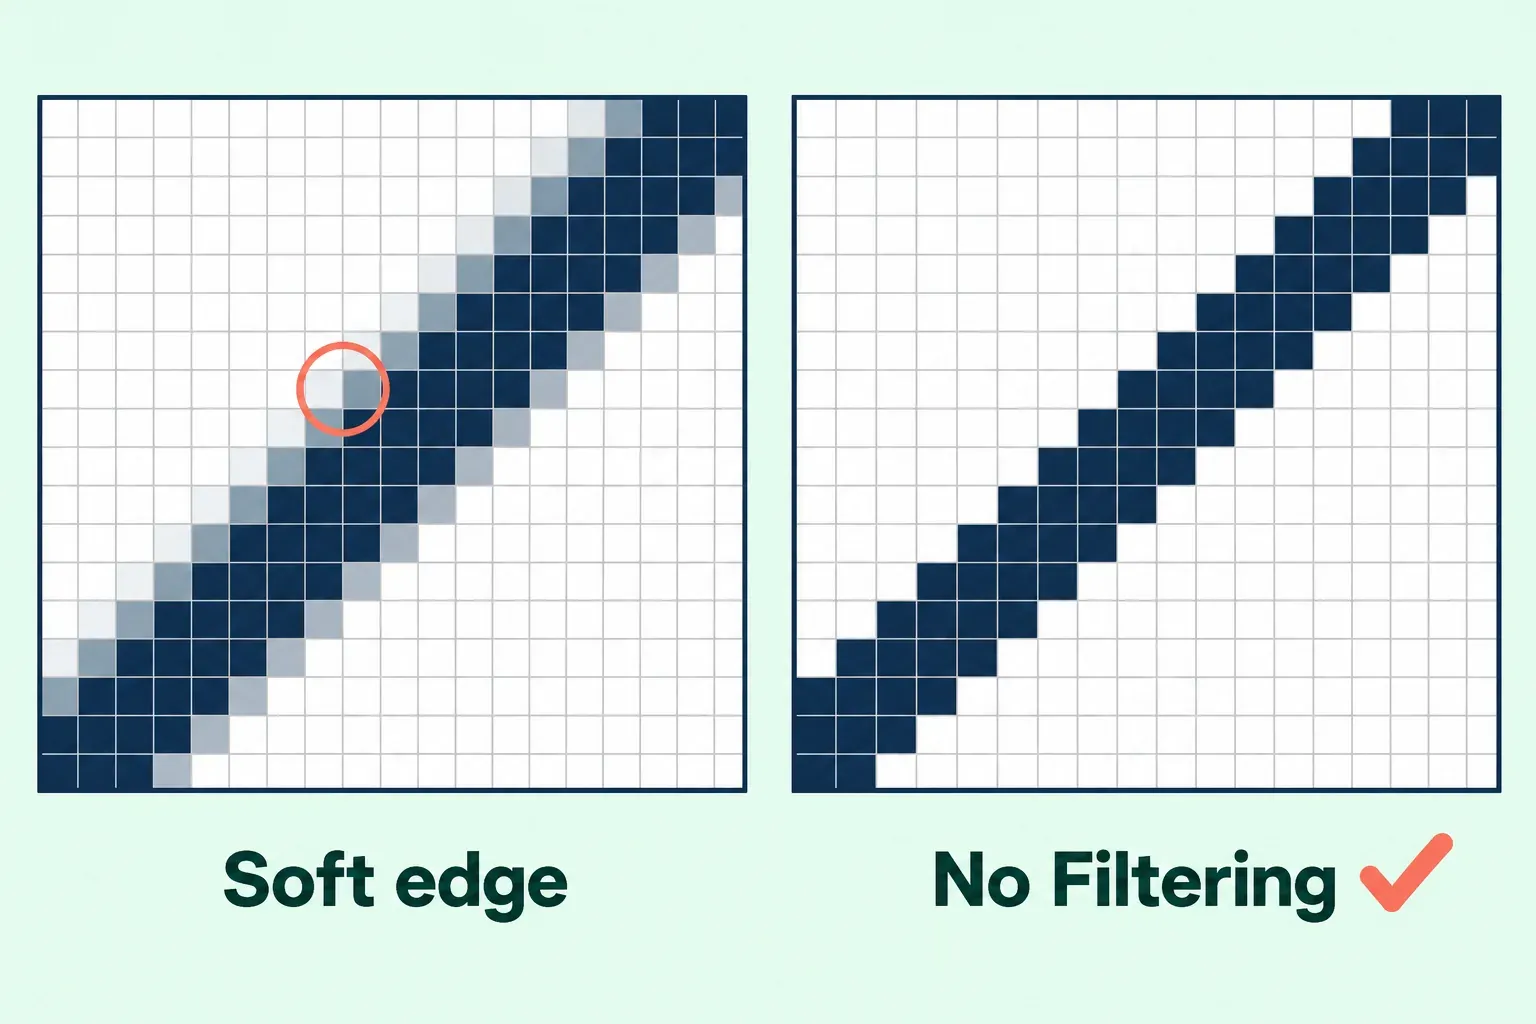
- Build your own. Start from a pure white square as the Shape Source, then set Shape Filtering and Grain Filtering to No Filtering in Brush Studio.
I'd start with the Bardot set. It's free, the One-Pixel Stamp is made for exactly this job, and the included canvases save the setup above. Build your own once you know what you'd change.
If you build one, the details matter. A Folio moderator explains in a help thread on brush sources that white in a Shape or Grain Source paints fully opaque and black paints nothing, so a pure white square gives a solid pixel. The Brush Studio Settings page says No Filtering "doesn't soften the edges at all." In a Folio thread on antialiasing, a staff member confirmed that a crisp Shape Source set to No Filtering "shouldn't be antialiased." The full build, from drawing the shape to importing it, is in the Shape and Grain steps of the brush guide, and the brush settings guide explains each filtering option.
A moderator in that antialiasing thread adds two warnings. Filtering alone won't make a pixel brush, because "the shape source image also needs to be sharp," and wetness, tapering, speed dynamics or pressure settings can bring softness back. Another artist there got "a perfect two-tone brush" from a 1x1 pixel tip. Build from that 1x1 tip and set every pressure and taper effect to zero, so the brush puts down the same square however you hold the Pencil.
Size is the slippery part, since a nudge of the slider changes your pixel. Two features pin it down. Brush Size Memory saves up to four size marks per brush: drag the size slider, tap the + at the top right of the preview window, and a small line marks that size on the slider, as the Paint, Smudge, and Erase page shows. In Brush Studio, the Brush Behavior settings Maximum Size and Minimum Size set the limits of the sidebar slider, so you can keep it close to one pixel. Then, with your pixel brush active, tap and hold the Erase icon. That transfers the brush to the eraser, so erasing removes whole pixels too.
Fill areas cleanly
ColorDrop fills a closed shape faster than tapping pixels in. Drag the active color from the top right onto the area and release. Per the Colors Interface page, the color "will spread outwards until it hits a boundary." A No Filtering outline has no half-transparent edge pixels, so the fill meets the line without a pale gap. Hold before you release and ColorDrop Threshold appears: drag left to lower it and right to raise it. Lower values fill more precisely.
A leak into the next area usually comes from a gap in the outline or a threshold set too high. Zoom in on the outline first, then lower the threshold. Why ColorDrop leaks through a line walks through both, and ColorDrop not working covers fills that won't start.
Selections need more care. In the pixel art request thread, an artist reported in 2020 that rectangle and freehand selections perform "something akin to anti-aliasing" with no way to turn it off, and staff logged single-pixel selection problems for investigation in 2021. The current Handbook doesn't say either way, so after you move or cut a selection, zoom in and check its edges for gray pixels. When a sprite or object sits on its own layer, I'd move the whole layer with Transform instead of selecting it, because there's no selection edge to soften. Choosing, copying and moving a selection covers the selection modes.
Move, flip and resize pixels
Transform redraws your pixels with the interpolation mode on its toolbar. That's the circular icon second from the right, and the Transform interface page says its label changes to show the current mode: Nearest, Bilinear or Bicubic. Nearest Neighbor copies the closest pixel, which the Handbook calls "sharp and accurate" with jagged edges, the exact look pixel art wants. Bilinear blends a 2x2 area and Bicubic a 4x4 area, and both soften a sprite.
Two Handbook pages disagree on the default. The interface page says Nearest, while the Interpolation page says Bilinear. Read the label before your first move, tap it and choose Nearest. The Transform interpolation guide explains when each mode makes sense. With Nearest set, three habits keep moves predictable:
- Nudge instead of dragging. Tap outside the bounding box to move the content a step in that direction. The closer you zoom in, the smaller each step.
- Type exact sizes. Tap a blue corner or side node to open a keypad for exact pixel width and height. Keep the Link icon between X and Y connected for a Uniform scale, and enter whole numbers, not decimals.
- Flip and rotate in fixed steps. Flip Horizontal and Flip Vertical mirror a sprite, the fast way to make a character face the other direction. Rotate 45° turns content in 45° steps, and a pixel drawing at 45° breaks into jagged diagonals, so stick to quarter turns, which take two taps.
Snapping can pull a sprite onto a nearby edge as you drag. Its Distance setting is measured in pixels, and Magnetics, a separate switch, keeps a move on one axis. Snapping vs Magnetics explains when each one helps.
Export pixel art without blur
This is where most Procreate pixel art goes wrong. A 64 x 64 sprite can look soft when a viewer enlarges it with smoothing. An answer in a Folio thread on pixel art that turned blurry after sharing put it plainly: "An artwork sized 128x128 pixels is super small so it will naturally look blurry if you look at it zoomed in," and DPI doesn't change that. Resizing with Resample doesn't help either. Crop and Resize then enlarges the image "using bicubic interpolation," creating new in-between pixels that blur every edge. Why Procreate exports look blurry covers the same problem for paintings.
Choose the file's destination before scaling. If a game or app project requires a 64 x 64 asset, export that size and keep the editable master. For a larger display image, upscale a duplicate by a whole number with Nearest Neighbor so each source pixel becomes a solid block. A member of that thread laid out the core of it: Resample off, a much larger canvas, Nearest Neighbor, then a uniform scale up. Here's the full version, with the step that makes it reliable:
- Duplicate the artwork. In the Gallery, swipe left on the thumbnail and tap Duplicate. The upscale is hard to undo cleanly later, so work on the copy and keep the small original for edits.
- Add a filler layer. Add a new layer, drag it to the bottom, tap it and choose Fill Layer. Transform's bounding box is "the exact width and height of the content inside it," so a sprite that doesn't touch all four edges would scale on its own instead of with the whole canvas. A filled layer makes the content exactly as big as the canvas.
- Select every layer. Tap the top layer, then swipe right on each of the others. Transform acts on all selected layers.
- Enlarge the canvas with Resample off. Go to Actions → Canvas → Crop and Resize and check that Resample is off. Tap the width readout and type an exact multiple, such as 512 for a 64 px canvas, do the same for the height, and confirm. The canvas grows while your artwork stays at its old size for now. Resizing a canvas explains Resample in more depth.
- Scale up with Nearest. Tap Transform, choose Uniform, set the interpolation label to Nearest and tap Fit to Screen. The filled content and the new canvas have the same shape, so Fit to Screen scales the art to fill the canvas exactly, here by 8x. Tap Transform again to finish.
- Remove the filler. Hide or delete the bottom layer if you want a transparent background.
- Export a PNG. Tap Actions → Share → PNG. The Share page calls PNG lossless and says it preserves transparency, and exporting a transparent PNG covers the background in detail.
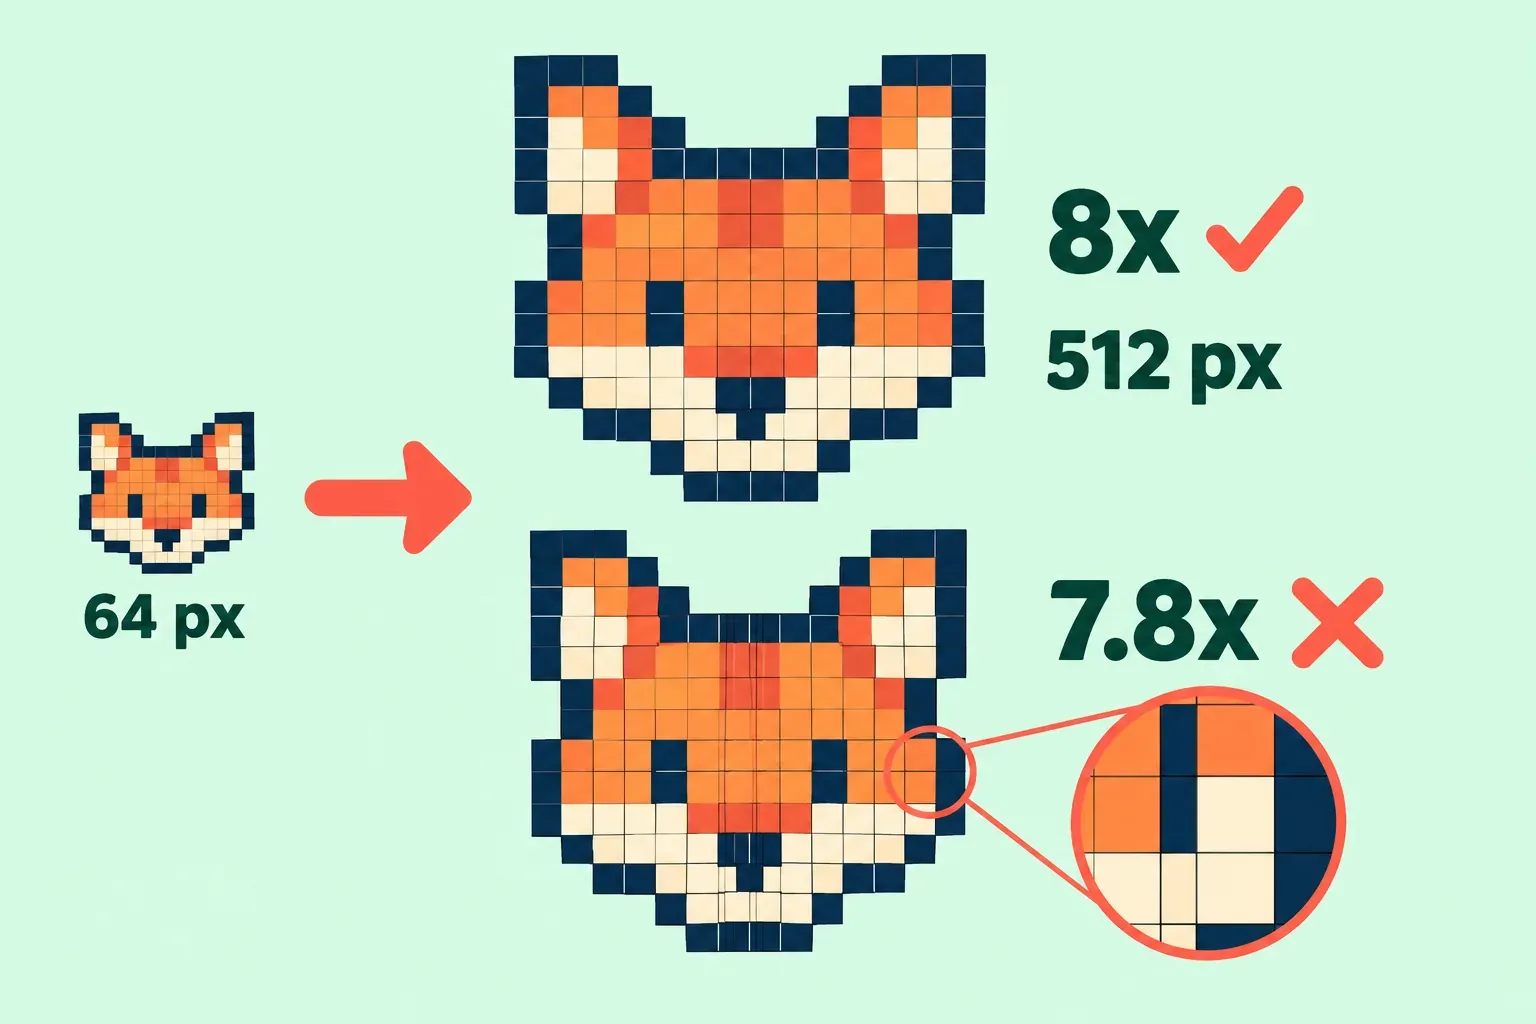
The multiple matters as much as the interpolation. My default is a whole-number factor every time, because Nearest Neighbor turns each pixel into an equal block only when the math divides evenly. Scale 64 px to 512 px and every pixel becomes 8 x 8. Scale it to 500 px, which is 7.8125x, and 64 source columns have to share 500 output columns, so some blocks come out 7 px wide and others 8 px. That shows as a wobble in straight lines.
| Canvas | Export size | Factor |
|---|---|---|
| 32 x 32 px | 512 x 512 px | 16x |
| 64 x 64 px | 512 x 512 or 1024 x 1024 px | 8x or 16x |
| 128 x 128 px | 1024 x 1024 px | 8x |
| 160 x 144 px | 800 x 720 or 960 x 864 px | 5x or 6x |
Crop and Resize shows how many layers the bigger canvas can hold, and the maximum canvas size depends on your iPad's hardware. If the size you want won't fit, pick the next smaller whole multiple.
Animate a sprite
Turn on Animation Assist in Actions → Canvas. Each layer becomes a frame, with "the bottom layer appearing first," per the animation export page. The Animation Settings page puts typical animation at about 12 drawings per second, and you set the speed with Frames per Second under Settings on the Animation Assist toolbar. Onion skin can show up to 12 neighboring frames; a low setting is easier to read with flat pixel colors, and onion skin settings covers frames, opacity and colors.
Upscale the frames with the steps above, then delete the filler layer before you export. Left in place, it becomes the first frame. Then tap Actions → Share and pick a format:
- Animated GIF. Choose Max Resolution or Web Ready, set the speed, and decide on dithering, a per-frame color palette and a transparent background. I'd choose Max Resolution with dithering off: Web Ready trades quality for file size, and dithering scatters dots to blend colors, which adds pixels you didn't place.
- Animated PNG. The Handbook says it offers higher visual quality than GIF but isn't "supported everywhere," so check that the place you're posting accepts it.
Fix soft, blurry or uneven pixels
| What you see | Likely cause | What to do |
|---|---|---|
| The sprite looks blurry once posted | The viewer enlarged a tiny image | Upscale by a whole number with Nearest before you export |
| Gray, half-transparent pixels along strokes | Brush filtering, a soft Shape Source, or pressure and taper settings | No Filtering on Shape and Grain, a crisp white 1x1 source, pressure and taper at zero |
| Edges went soft after a move or resize | Transform set to Bilinear or Bicubic, or Resample on in Crop and Resize | Undo with a two-finger tap, set Nearest, and resize with Resample off |
| Blocks have different widths after upscaling | A scale factor that isn't a whole number | Undo and use an exact multiple of the canvas size |
| The upscaled art sits off-center or leaves a border | The sprite didn't fill the canvas, so the bounding box was smaller | Add the filled bottom layer before Fit to Screen |
| A gray fringe around a moved selection | Selection edge smoothing, reported on Folio | Undo, then move the whole layer with Transform |
| Doubled pixels and uneven steps in lines | Strokes wandered off the grid | Shorter strokes, single taps, or Drawing Assist for straight runs |
| You can't judge the real size while zoomed in | A tiny canvas fills the whole screen | Add Actual Size to QuickMenu to see the art at its true pixel size |
That last tip comes from the antialiasing thread, where a moderator suggests adding the Actual Size command to QuickMenu. The QuickMenu page describes it as showing "your artwork onscreen at actual pixel size," which shows what the sprite looks like at its true size before you upscale.
This is an independent guide. It is not affiliated with or endorsed by Procreate.